
Have you ever watched a video that looked smooth and professional? One big reason for this is seamless scene transitions. Transitions help connect different parts of a video so that everything flows naturally. If transitions are rough, the video may feel choppy and distracting. But if done right, they make your video look polished and engaging.
In this blog, we will explain how to create smooth transitions in your videos. We will also talk about useful tools like video editing software, AI voiceovers, and AI video generators that can make your transitions even better. At the end, we will guide you through how to add transitions using CapCut Desktop.
What Are Scene Transitions?
A scene transition is a way to move from one video clip to another. It helps make the change between clips look natural instead of sudden or awkward.
Types of Transitions
Here are some common types of scene transitions:
-
Cut: A direct change from one clip to another.
-
Fade In/Out: The screen slowly turns black or white before the next scene appears.
-
Cross Dissolve: One clip fades into another smoothly.
-
Slide/Wipe: The next scene slides over or wipes away the previous one.
-
Zoom/Spin: Adds motion effects to make transitions fun and creative.
Using the right transition depends on the mood of your video. For example, a fade-in is good for emotional videos, while a zoom effect may work well in action scenes.
Best Practices for Smooth Scene Transitions
To make your transitions look natural and professional, follow these simple tips:
-
Keep transitions simple. Too many effects can make your video look unprofessional.
-
Match colors and motion. If the first clip has a blue background, try keeping the next clip similar.
-
Use sound effects. Adding smooth audio transitions helps make scene changes feel more natural.
-
Plan your shots. Before recording, think about how one scene will move into the next.
-
Stick to a theme. Make sure transitions match the style of your video.
Tools That Help You Create Seamless Transitions
Now that you understand the importance of scene transitions in video editing, it’s time to explore the tools that can help you execute them flawlessly. Transitions enhance storytelling, create smooth visual flow, and keep your audience engaged. To achieve professional results, you need video editing software to add and adjust transitions. Here are some of the best ones:
-
CapCut – AI-Powered and Beginner-Friendly
CapCut is a free, intuitive AI video generator with AI-powered tools that make adding transitions seamless. It offers pre-built transition effects, auto-cut features, motion tracking, and smooth speed adjustments—all in an easy-to-use interface. It’s perfect for social media content creators looking to enhance their videos without a steep learning curve.
-
Adobe Premiere Pro – Industry Standard for Professionals
Used in Hollywood films and TV shows, Adobe Premiere Pro provides advanced transition effects, keyframe precision, and seamless integration with After Effects for custom animations. Its motion blur, speed ramping, and cross-dissolve effects ensure smooth scene transitions, making it the top choice for professional editors.
-
DaVinci Resolve – Best for Color Grading and Precision Editing
DaVinci Resolve stands out for its high-quality editing, color grading, and Fusion visual effects. It offers customizable transitions, cinematic fade-ins/outs, and detailed timeline editing, making it a powerful tool for filmmakers and content creators seeking a polished look.
-
Final Cut Pro – Optimized for Mac Users
Final Cut Pro delivers fast rendering speeds, magnetic timeline editing, and advanced transition effects designed specifically for Mac users. Its cinematic mode, smooth morph cuts, and real-time previews help creators produce professional-grade videos effortlessly.
Each of these tools enhances transitions, allowing you to create captivating, high-quality videos with ease.
How to Add Transitions Using CapCut Desktop Video Editor
CapCut is one of the easiest tools for adding scene transitions. Follow these steps to apply transitions in CapCut Desktop:
Step 1: Open CapCut and Import Your Video Clips
Download and open CapCut Desktop. Click “New Project”. Click “Import” and add your video clips. Drag your clips to the timeline.

Step 2: Find the Transition Point
Identify the point where one scene ends and another begins. If needed, use the split tool to cut clips.
Step 3: Add a Transition Effect
Click the transition icon between two clips. Choose a transition effect (Fade, Blur, Zoom, etc.). Adjust the effect to match your video style.
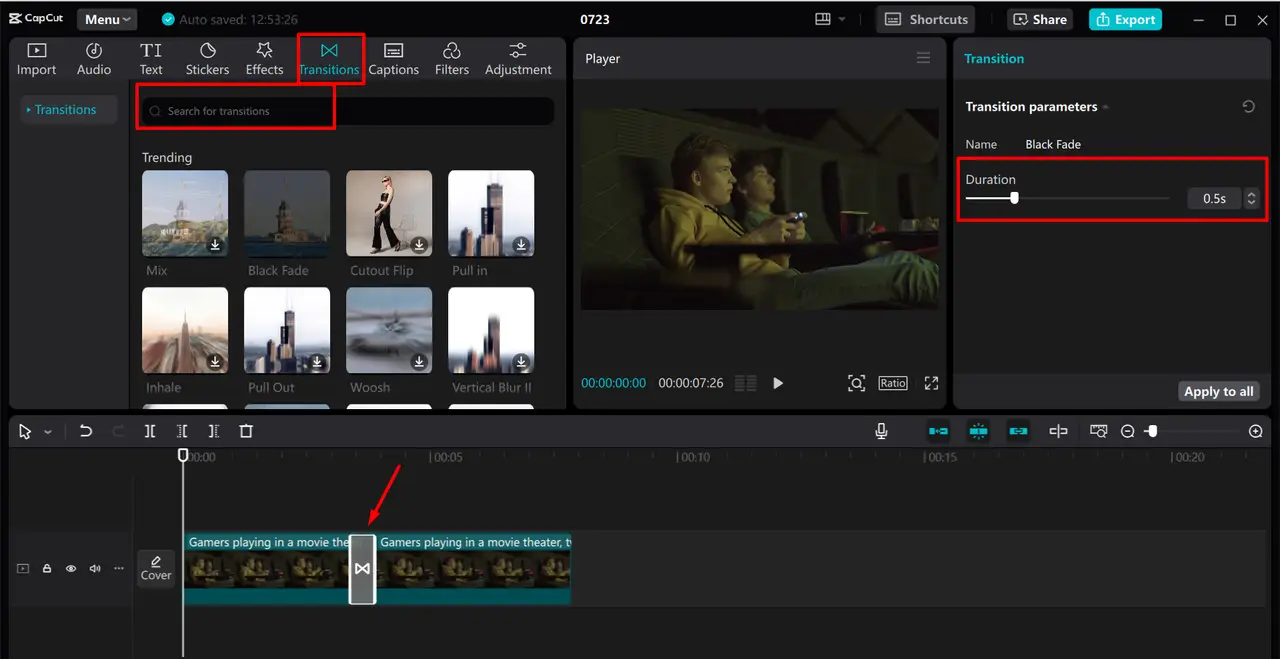
Step 4: Adjust the Duration
Drag the slider to increase or decrease the transition length. Some transitions allow you to customize speed and direction.
Step 5: Use AI Features (Optional)
Apply CapCut’s AI motion tracking to make transitions smoother. Use the AI voiceover or text to voice tool to add narration for better storytelling.
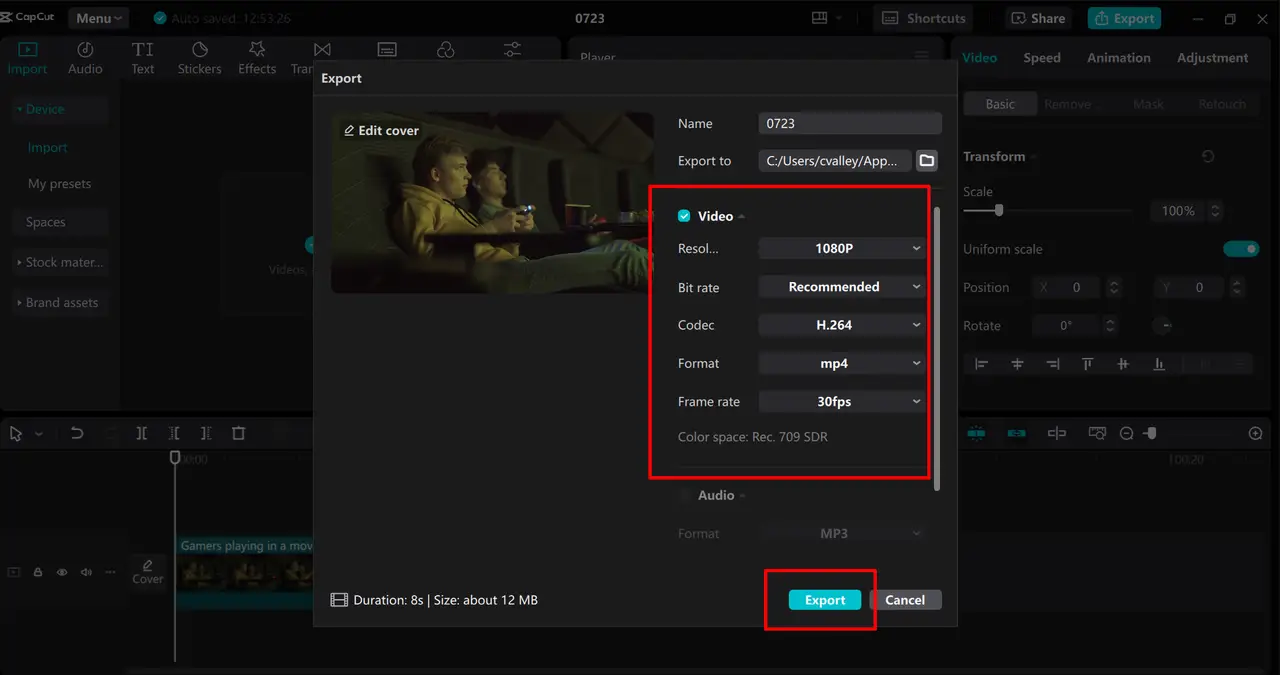
Step 6: Preview and Export
Click Play to check your transitions. Make adjustments if needed. Click Export to save your video.
Common Mistakes to Avoid
Even with good tools, mistakes can make transitions look bad. Avoid these common errors:
-
Using too many flashy effects. Keep transitions subtle and smooth.
-
Sudden cuts in audio. Always blend sound smoothly.
-
Mismatch in colors. Keep similar tones between clips.
-
Overusing the same transition. Use different transitions to keep things fresh.
Conclusion
Seamless scene transitions make your video look polished and engaging. The key is to choose the right type of transition, match colors and sounds, and avoid overuse. Tools like CapCut Desktop, AI voiceovers, and AI video generators can make this process easier.
If you’re new to editing, start with simple cuts and fades, then experiment with more creative transitions. Keep practicing, and soon, your videos will look more professional and smooth!